

icTools for LegalDocML User Guide
Aug 26, 2025
Introduction
Welcome to Intelligent Content Tools for the LegalDocML (icTools for LegalDocML). The tool supports LegalDocML tagging and checks the document for compliance with LegalDocML guidelines.
Working within the functionality of Microsoft Word both on desktop and online (Windows & Mac), the tool allows you to easily move to other Word ribbons and commands as you edit the document. This manual will guide you in using the tool to produce a compliant and well-formatted XML and JSON.

Contents
Prerequisites
The icTools for LegalDocML add-in is compatible with the following versions of Office on Windows and Mac.
For Windows
| Operating System | Office Version | Browser |
|---|---|---|
|
Windows 11 |
|
|
| Window 11, Windows 10 ver. >= 1903 |
Microsoft 365 ver. >= 16.0.13530.204241 | Microsoft Edge Legacy (Edge HTML) 3, 4 |
For Mac
| Operating System | Office Version | Browser |
|---|---|---|
| macOS Sequoia | Microsoft 365 (Subscription) | Safari (macOS only) |
| macOS Monterey | Microsoft 365 ver. >= 16.92 | Safari 15 and later are supported (Version 18.2 (20620.1.16.11.8)) |
| macOS Big Sur | Office 2021 Office 2019 (Limited support) |
Older versions may have limited compatibility. |
Intelligent Content Toolbar (Ribbon UI)
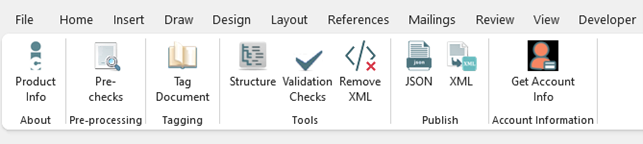
After opening a file in Word, click on the Intelligent Content tab to reveal the toolbar. Each group on the toolbar can be considered a step in the process of completing a document. Work across the toolbar beginning at the left.
Steps To Processing A Document
Step 1 – Product Information
The Product Info section provides details about the tool.Users can learn how it works, its use cases, and the benefits of applying it to their documents.
Step 2 - Pre-processing/Pre-Checks
This group works mainly with items that may impact document tagging. Corrections here help to ensure accurate tagging.
Step 3 - Tagging
Once Pre-Checks is completed, the document is ready for tagging. The time required to complete tagging is dependent on the length and density of the material in the document.
Step 4 - Structure & Validation Checks
Structure insures that the tagged added correct XML to the document.
Validations Checks ensures all required content is present and correct based on LegalDocML guidelines.
Step 5 - Publish
With the document accurately tagged and compliant, it is now ready to export in formats like XML and JSON.
Ribbon groups:
- About
- Product Info
- Pre-preprocessing:
- Pre-checks
- Tagging
- Tag Document
- Tools
- Structure
- Validation Checks
- Remove XML
- Publish
- JSON
- XML
- Account Information
- Get Account Information
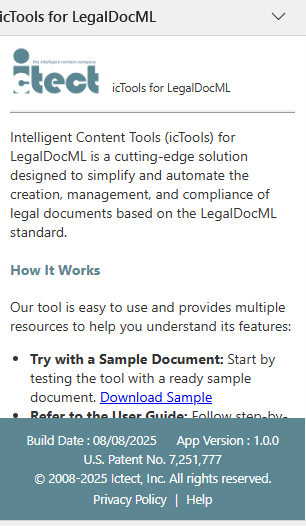
Product info
- This feature provides complete details about the tool
- Displays information such as:
- Tool description (how it works, usage, and purpose)
- Build date and version number
- Product details for customer reference
- Helps users understand the functionality and background of the add-in
Pre-Checks

Pre-Checks mainly work on items that impact tagging. With correct tagging, accurate validation checks, and XML/JSON export can be done.
These Pre-checks include ‘Revisions’, ‘Comments’, ‘Text Boxes/Text Frames’, ‘Anchored Objects’, and more.
Tooltip on ribbon:
This option quickly identifies revisions, comments, floating images, floating textboxes, etc. Take appropriate action based on the check results.
To use Pre-Checks:
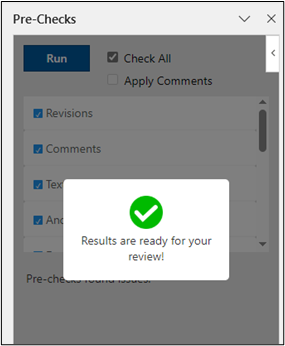
- Click on the Pre-Checks button to open a task pane UI with a list of pre-checks (driven by API).
- “Check All” checkbox is checked by default, we can uncheck this if we want specific checks to run.
- “Apply Comments” checkbox is to apply comments on the issues in the document when we run the checks, it is greyed out for now.
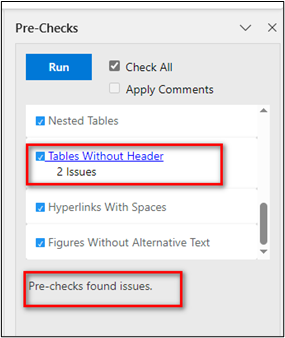
- Click the ’Run’ button. Items with issues will appear as blue hyperlink.
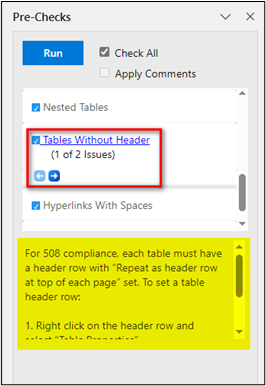
- Click on the blue hyperlink and use prev and next arrow buttons to navigate to the issue.
- Act as needed for each issue occurrence.
- Rerun the checks if there are any corrections made in the document.
Pre-Checks and their Messages
Messages will appear in the task pane for any checks when we click on hyperlinks.
| Pre-Checks Name | Message |
|---|---|
| Revisions | The document contains one or more revisions. Please accept or reject all revisions prior to tagging. |
| Comments | Please delete all comments prior to tagging. |
| Text Boxes/Text Frames | Text Boxes cannot be converted to XML. If the text box is used to represent regular text then please delete the text box, moving its content into the document. If the text box is used to compose a figure then convert the figure into a single image and delete the text box. Text Frames cannot be converted to XML. If the text frame is used to represent regular text then please delete the text frame, moving its content into the document. If the text frame is used to compose a figure then convert the figure into a single image and delete the text frame. |
| Anchored Objects | The document contains Anchored Objects that cannot be handled by the program and may not be converted to XML. Each object must be in line to the text. |
| Drawing Tools | The document contains drawing tool/canvas that cannot be converted by the program. |
| OLE Embedded Objects | The document contains embedded OLE objects that cannot be handled by the program and may not be converted to XML. |
| WordArt/SmartArt | SmartArt cannot be converted to XML. If the SmartArt is used to represent regular text then please delete the SmartArt, moving its content into the document. If the SmartArt is used to compose a figure then convert the figure into a single image and delete the SmartArt. |
| Floating Tables | Please set the “Text Wrapping” property of the table to “None”. |
| Nested Tables | The document contains some nested tables that cannot be read by the program and may not be converted to XML. |
| Tables Without Header | For 508 compliance, each table must have a header row with “Repeat as header row at top of each page” set. To set a table header row: 1. Right click on the header row and select “Table Properties”. 2. Click the “Rows” tab. 3. Check “Repeat as header row at top of each page”. 4. Click “OK”. |
| Hyperlinks With Spaces | Please remove all spaces in the hyperlink. |
| Figures Without Alternative Text | All figures must have alternative text. Please right click on image and select “View Alt Text” to set alternative text for image. |
Tag Document
When the button in the Tagging group is clicked, the software automatically creates tags. The tags may be seen by clicking on the Show/Hide Structure button in the Tools group.
Users can click the "Tag Document" button for tagging the document. Once the document is tagged, the structure can be viewed, and validations checks can be run to identify issues.
Tooltip on ribbon:
This option performs one-click tagging on entire document.
To use Tag Document:
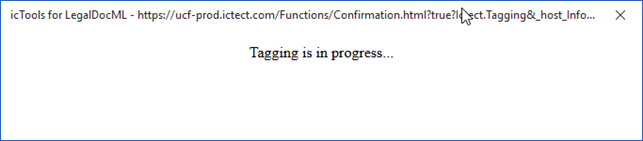
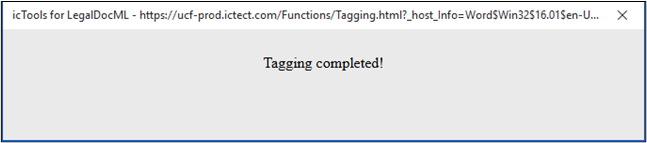
- Click on the ‘Tag Document’ button, it will take a few seconds to some minutes based on the length of the document.
- Once Tagging is complete, a popup confirmation message will display to the user.
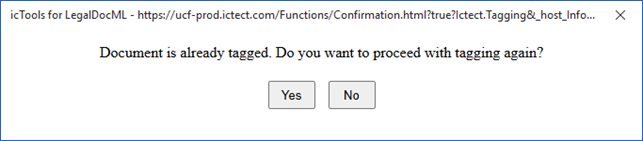
Corrections Made After Tagging
When a correction is made to already tagged content, existing tags may be impacted. Correct tags are needed for accurate check results and proper formatting, so retagging is required in that case.
If the document is already tagged, then the popup below will be shown.
Structure
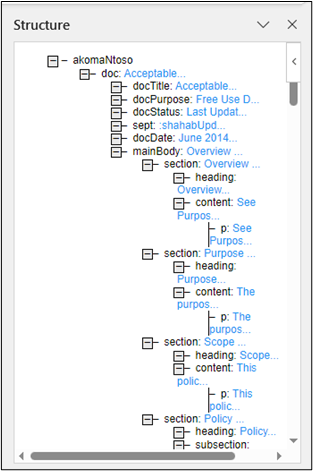
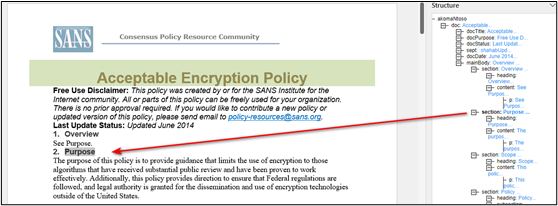
A feature showing the organization of tags applied is called Structure. Clicking on Structure in the Tools group opens the Structure window (document markup) on the right of the screen.
Clicking on any tag in the Structure to navigate to the corresponding content in the document and vise versa.
To roll up parts of the structure, click on the ‘-’ sign. The child content will roll up and a ‘+’ sign will now show to indicate there are items within it. Clicking the ‘+’ sign will roll down the content within the parent.
Tooltip on ribbon:
This option allows to view the XML structure in Word document. Double-click on any tag in the structure tree to navigate to the location of the tag in the document.
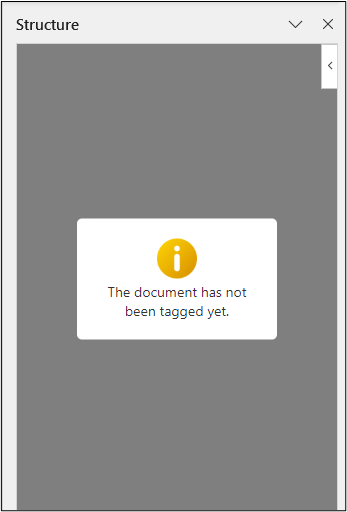
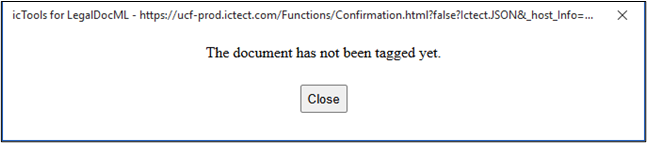
If the user has not tagged the document and clicks the "Structure" button, the message "The document has not been tagged yet." will appear in the structure task pane.
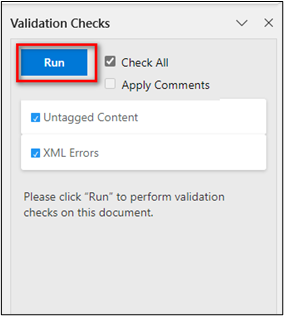
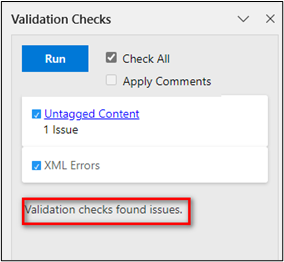
Validation Checks
Allows the user to identify any issues after tagging the document. These checks include ‘Untagged Content’ and ‘XML Errors’.
If the user has not tagged the document and clicks the "Validation Checks" button, the message "The document has not been tagged yet." will appear in the task pane.
Tooltip on ribbon:
Validation Checks ensure all required content is present and correct based on specified guidelines.
To use Validation Checks:
- Click on the Validation Checks button to open a task pane UI with a list of pre-checks (driven by API).
- “Check All” checkbox is checked by default, we can uncheck this if we want specific checks to run.
- “Apply Comments” checkbox is to apply comments on the issues in the document when we run the checks, it is greyed out for now.
- Click the ’Run’ button. Items with issues will appear as blue hyperlink.
- Click on the blue hyperlink and use prev and next arrow buttons to navigate to the issue.
- Act as needed for each issue occurrence.
- Rerun the checks if there are any corrections made in the document.
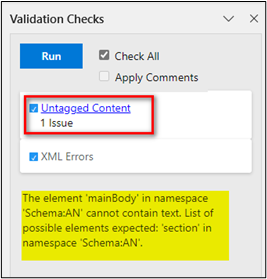
Validation Checks and their Messages
Messages will appear in the task pane for any checks when we click on hyperlinks.
| Validation Checks Name | Message |
|---|---|
| Untagged Content | This content is untagged. Please review and modify as appropriate. |
| XML Errors | This element is invalid in this context. This could be because of: - Missing elements - Duplicated elements - Incorrect sequence of elements - Invalid attribute value on element. |
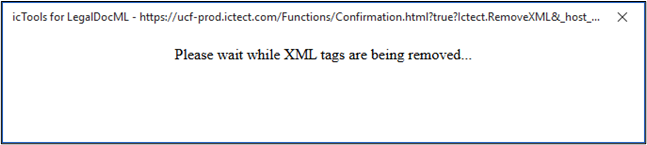
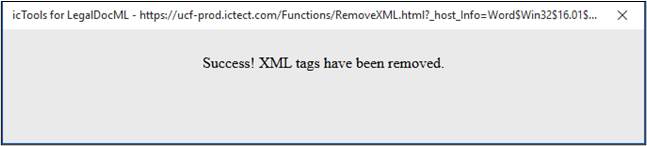
Remove XML
The remove XML is used to Remove XML (tagging structure) from document. This option will remove all the XML tags in the document. This may be helpful if retagging a longer document as it quickly removes the XML tags prior to tagging the entire document.
Tooltip on ribbon:
This option removes the XML tags from the entire document.
If the XML is removed from the document and the "JSON" or “XML” button is clicked, the following message will appear.
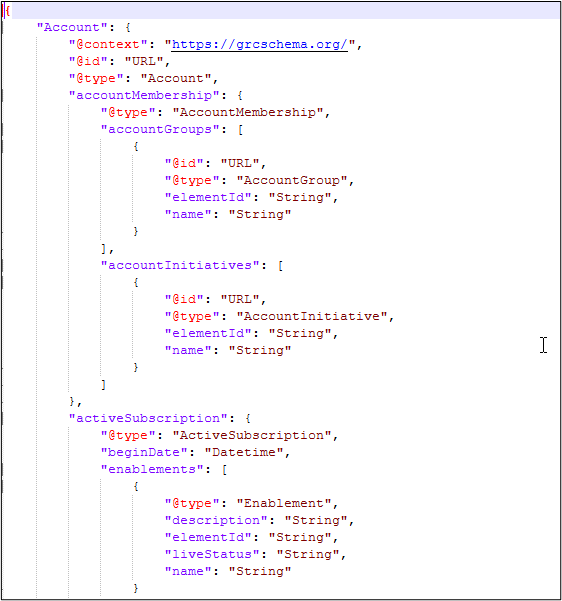
JSON
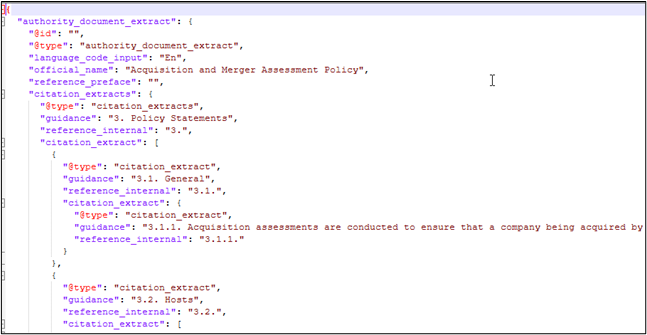
When the user clicks the 'JSON' button on a tagged document, the JSON file is downloaded. The file will appear in the upper left corner of the screen.
Tooltip on ribbon:
This option exports the tagged Word document into JSON format.


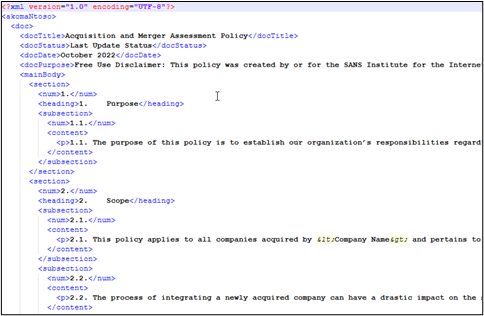
XML
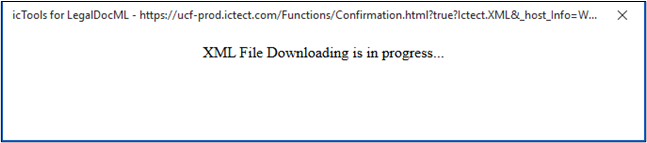
When the user clicks the 'XML' button on a tagged document, the XML tagged document from word document is downloaded. The file will appear in the upper left corner of the screen.
Tooltip on ribbon:
This option exports the tagged Word document into XML format.
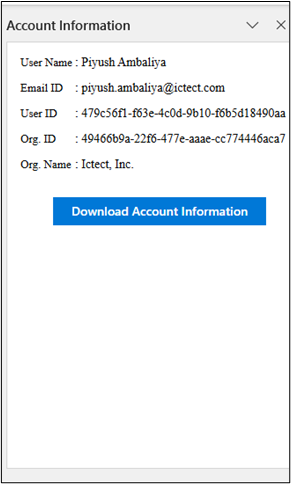
Get Account Info
This button displays the account information, and when the "Download Account Information" button is clicked, it downloads the user information in JSON format.
Tooltip on ribbon:
This option displays the user account details and allow the user to download more details.